American Heart Association Training Center
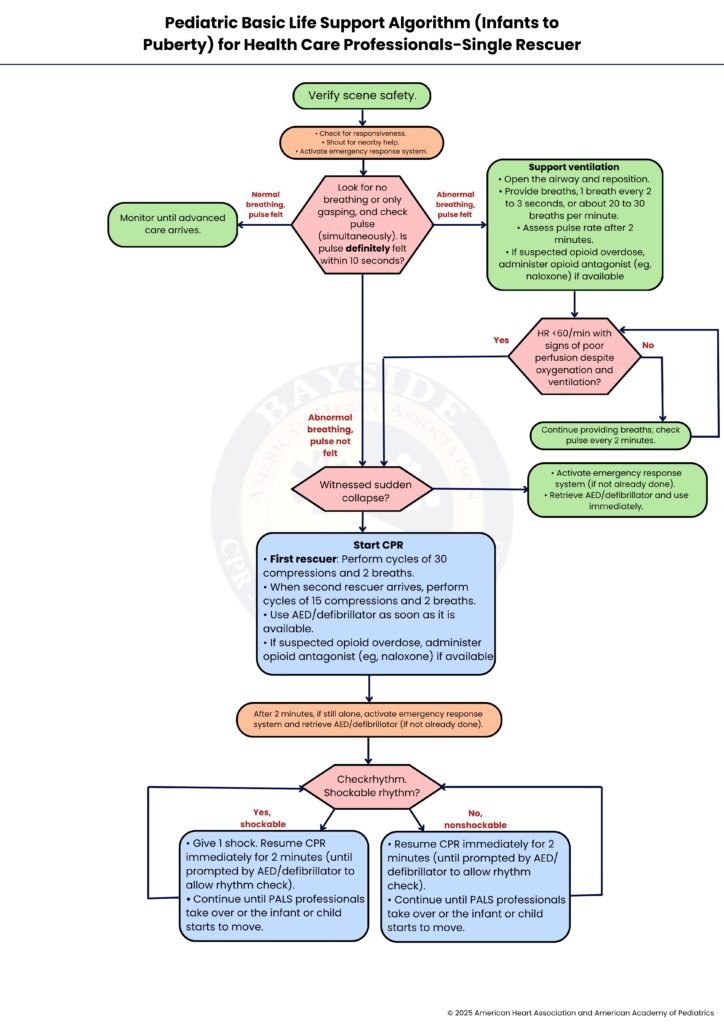
The Pediatric Basic Life Support (BLS) Algorithm for infants to puberty is a structured approach developed to recognize and manage life-threatening emergencies, particularly cardiac arrest, in children from birth up to around 12 years. It emphasizes early recognition of unresponsiveness, prompt activation of emergency services, and high-quality CPR (Cardiopulmonary Resuscitation) with age-appropriate chest compressions and rescue breaths, incorporating the use of AEDs (automated external defibrillators) when available and special considerations for airway obstruction, trauma, and two-rescuer scenarios.
Healthcare professionals, such as doctors, nurses, and paramedics, rapidly assess the child, provide advanced interventions, coordinate care, and ensure proper documentation and communication. In contrast, a single rescuer, often a parent or first responder, focuses on maintaining high-quality BLS, ensuring scene safety, calling for help, performing CPR with the correct compression-to-ventilation ratio, and using an AED when available. By following this algorithm, both healthcare providers and single rescuers can systematically respond to pediatric emergencies, improving the child’s chances of survival and favorable outcomes.
Note: This pediatric basic life support algorithm (infants to puberty) for healthcare professionals-single rescuer guideline is valid for 2025-2030
Helping a child in an emergency can feel scary, but quick action can save a life. This guide will walk you through pediatric BLS step by step so you know exactly what to do.
01.
Before approaching the child, make sure the environment is safe for both you and the child. Check for hazards like traffic, fire, electricity, or unstable objects. Safety comes first; there’s no point in helping if you also get hurt.
02.
Gently tap the child and call out their name to see if they respond. If they don’t, shout for nearby help to alert anyone around. Immediately activate the emergency response system by calling EMS (e.g., 911) or sending someone to do so. Early activation is critical for getting professional help and an AED on the way.
03.
Quickly check whether the child is breathing normally or only gasping, and simultaneously feel for a pulse at the brachial artery in infants or the carotid/femoral artery in children. This assessment should take no more than 10 seconds. If the child has normal breathing and a pulse, proceed to Step 3a. If the child has abnormal breathing but a pulse is present, move to Step 3b. If the child has abnormal breathing and no pulse is detected, go directly to Step 5 to start CPR.
3a.
If the child has normal breathing and a pulse, continue to monitor their condition closely until advanced care arrives. Keep the airway open and watch for any changes in breathing, color, or responsiveness. Be ready to act immediately if the child’s condition worsens or if they stop breathing.
3b.
If the child has a pulse but is not breathing adequately, assist ventilation. Open the airway using a head-tilt/chin-lift (or jaw thrust if trauma is suspected). Deliver 1 breath every 2–3 seconds (about 20–30 breaths per minute), ensuring visible chest rise. Reassess the pulse every 2 minutes. If opioid overdose is suspected, administer naloxone if available and trained to do so.
04.
Assess the child’s heart rate and signs of perfusion. If the heart rate is less than 60 beats per minute and there are signs of poor perfusion despite adequate ventilation, proceed to Step 5 to start CPR immediately. If the heart rate is higher or perfusion appears adequate, continue providing supportive ventilation and reassess the pulse every 2 minutes, following Step 4a.
4a.
Continue providing rescue breaths at the recommended rate. Reassess the pulse every 2 minutes to detect any deterioration. If the heart rate drops below 60/min with poor perfusion, proceed to CPR (Step 5). Otherwise, keep cycling between reassessment and ventilation.
05.
Assess whether the child’s collapse was sudden and witnessed. If it was witnessed, proceed to Step 5a for immediate activation of emergency response and AED retrieval. If the collapse was not witnessed, start CPR immediately by moving to Step 6.
5a.
If emergency help has not yet been activated, immediately call EMS and retrieve the AED or defibrillator. As soon as the AED is ready, follow its prompts to assess and, if advised, deliver a shock. After using the AED, continue with CPR by proceeding to Step 6.
06.
Begin CPR immediately. If you are alone, perform cycles of 30 chest compressions followed by 2 rescue breaths. When a second rescuer arrives, switch to 15 compressions and 2 breaths for more efficient resuscitation. Use the AED or defibrillator as soon as it becomes available, and if an opioid overdose is suspected, administer naloxone if available.
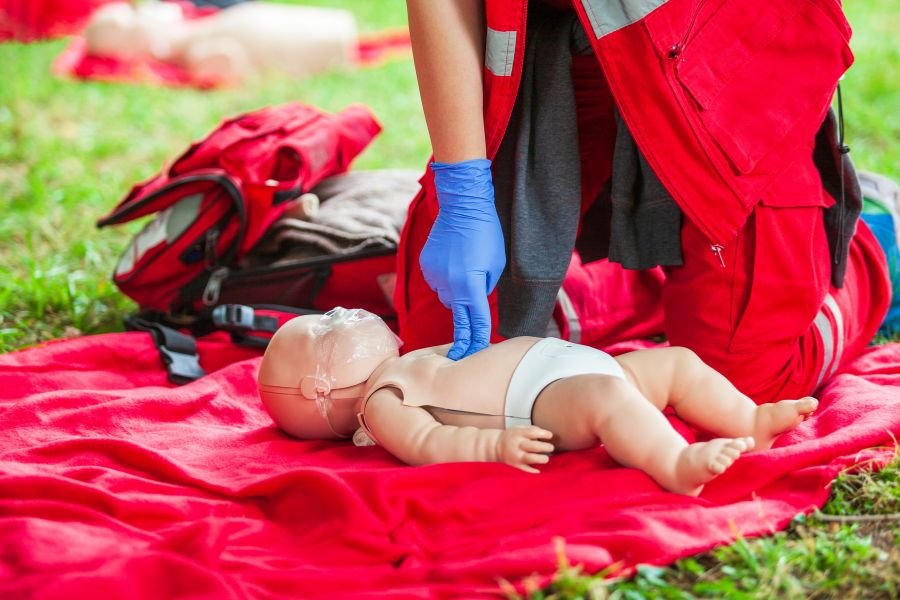
For effective chest compressions: in infants, use two fingers if you are alone or the two-thumb encircling hands technique with two rescuers, compressing about 4 cm deep. In children, use the heel of one hand if alone or both hands with two rescuers, compressing about 5 cm deep. Maintain a rate of 100–120 compressions per minute and allow the chest to fully recoil after each compression to maximize blood flow.
07.
If you are still alone after performing CPR for 2 minutes, activate EMS and retrieve the AED if this has not already been done. Continue performing CPR without interruption, maintaining the proper compression-to-ventilation ratio and technique until help arrives or the child shows signs of life.
08.
Once the AED is ready, use it to assess the child’s heart rhythm. If the rhythm is shockable, such as ventricular fibrillation or pulseless ventricular tachycardia, proceed to Step 9. If the rhythm is non-shockable, such as asystole or pulseless electrical activity, move to Step 10. Follow the AED prompts carefully and continue CPR as directed.
09.
If the AED identifies a shockable rhythm, deliver one shock immediately as directed. After the shock, resume CPR for 2 minutes without delay. Continue this cycle of shocking and CPR until advanced pediatric life support professionals take over or the child begins to show signs of life, such as movement, breathing, or a palpable pulse.
09.
If the AED identifies a non-shockable rhythm, such as asystole or pulseless electrical activity, continue performing CPR for 2 minutes, following the AED prompts for periodic rhythm checks. Repeat these cycles of CPR until advanced pediatric life support professionals arrive or the child begins breathing, moving, or showing signs of life.
In summary, the pediatric basic life support algorithm gives you a clear and steady path to follow when every moment matters. It helps you stay calm, act quickly, and focus on what truly saves a child’s life. By checking safety, calling for help, and giving strong and steady CPR with the right technique, you can make a real difference even if you are the only rescuer. Using an AED as soon as it is available and staying consistent with your actions keeps the child’s chances of survival higher. With practice and confidence, this step-by-step approach turns a stressful moment into one where you can act with purpose and care. Want to be prepared to respond to a child’s emergency? Enroll in our BLS course at Bayside CPR and gain life-saving skills you can trust.
The pediatric BLS algorithm is a step-by-step guide that helps you respond to a child’s emergency. It shows you how to check for danger, call for help, and give CPR the right way.
First, make sure the scene is safe for you and the child. Then check if the child responds and call for emergency help right away.
Check if the child is breathing normally and has a pulse within 10 seconds. If they are not breathing normally and you cannot feel a pulse, start CPR immediately.
Give 30 chest compressions followed by 2 rescue breaths in each cycle. Keep a steady rhythm and continue until help arrives or the child starts to respond.
Use an AED as soon as it is available during CPR. Follow the voice prompts and continue CPR right after each step.